I created these cards for a class.
The card with the owl is embossed with black embossing powder. To create the moon, I made a stencil with a 1-3/4" punch, and sponged on the cardstock with Daffodil Delight and a bit of Peach Parfait. I then sponged all around the edges of the card with Basic Black.
The 3 x 3" Happy Halloween card was stamped with VersaMark to create the watermark look.
The "spooky" card was stamped with StaZon. Using a little bit of bleach, I dipped a brush into the bleach and then brushed lightly where I wanted the color to fade. For this particular card, I used Perfect Plum cardstock. If you want to use another cardstock, I suggest you try the bleach on the cardstock first, because not every cardstock fades the same way, and you may end up with a look you didn't want!
After you bleach your cardstock, let it dry before you add more bleach. You can speed up the drying process by using the Heat Tool. Once it's dry, and you think it needs more bleach, you can add it at this point.
I hope you like it! Enjoy!
Stamp Sets: House of Haunts (111574), Wicked Cool (W 118738, C 120600)
Friday, September 30, 2011
Thursday, September 29, 2011
Happy birthday card in an envelope
This is one of the projects from "Workshop in a Bag" that we received at Convention. The card is 3-1/2 x 5" and fits into the Note Card envelope. It's ideal for a workshop, it's easy and fun to make and I hope you like it!
Enjoy!
Stamp Set: Easy Events (W 116958, C 123225)
Enjoy!
Stamp Set: Easy Events (W 116958, C 123225)
Wednesday, September 28, 2011
How to cover an inexpensive notepad
This is another nice gift and very inexpensive (but you can make it look beautiful!). The pen matches the Designer Series Paper used to cover the notepad and makes the gift even cuter.
For a 3-1/2 x 8" pad you'll need a Soft Suede cardstock that measures 9 x 8-1/2". With your cardstock on landscape position, score at 3-7/8", 4-3/8" and 4-7/8".
For a 4 x 8" pad, you'll need a Soft Suede cardstock that measures 10 x 8-1/2". On landscape position, score at 4-1/4", 4-5/8" and 5-1/8".
Now decorate your cardstock any way you like.
To make the slot for the pen, you have to cut TWO horizontal lines between the first and last score lines (these lines will be perpendicular to the score lines). I cut mine at 3-1/2" and 4-3/4" from the top respectively.
To decorate the pen, buy one of those pens that you can unscrew the bottom. Roll up a little piece of DSP that matches the decoration of your notepad and insert it inside the pen.
Don't hesitate to contact me with any questions you may have.
Have a great day!
Cardstock: Soft Suede (115318), Old Olive (100702)
Designer Series Paper: Beau Chateau (122357)
Stamp Set: Raining Flower (W 122765, C 122767)
Ink: Early Espresso (119670), Cherry Cobbler (119669)
Ribbon: Old Olive 5/8" Satin (117292)
Punch: Lace Ribbon Border (122362)
Tuesday, September 27, 2011
Little Black Notebook
I'm so excited to share with you this idea that I took from Gina K. It's so much fun to make and so easy! It's a great gift for the holidays or for any occasion.
If you want the instructions on how to make it, just send me an email and I'll be glad to explain it to you, but you can click here or the link above to see the instructional video from Gina.
Enjoy!
Cardstock: Basic Black (121045), Whisper White (100730)
Stamp Set: Dreams du Jour (discontinued)
If you want the instructions on how to make it, just send me an email and I'll be glad to explain it to you, but you can click here or the link above to see the instructional video from Gina.
Enjoy!
Cardstock: Basic Black (121045), Whisper White (100730)
Stamp Set: Dreams du Jour (discontinued)
Monday, September 26, 2011
Cupcake card and box
Once more, I was inspired by our Idea Book & Catalog. It's amazing to see how many designs I can come up with by just skimming through it.
I created the card for a class, which by the way was in Spanish, so I wanted to promote stamps written in Spanish. This particular one was perfect for the occasion. I used the punch that goes with the stamp set.
The box was created for the same class, with another stamp in Spanish. I added Crystal Effects to the girl's dress and Dazzling Details to the butterfly as finishing touches.
Enjoy!!
Stamp Set: Crea Un Pastelito (W 122403, C 122405), Confía en mi (W 124690, C 124692)
Punch: Cupcake Builder (121807)
Saturday, September 24, 2011
One Sheet Holiday Box
This is a box I created for my card class on Fridays. I got the tutorial from Splitcoaststampers. You can find it here. It's easy and very useful for the upcoming Holiday season.
First, I stamped the cardstock with a Time For a Tree wheel in Chocolate Chip. Then I simply created the box. Hope you like it! Enjoy!
Cardstock: Chocolate Chip (102128), Very Vanilla (101650)
Ink: Chocolate Chip (101065), Real Red (103133)
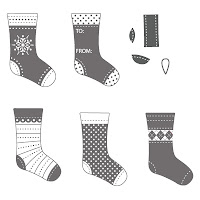
Stamp Set: Stitched Stockings (W 123782, C 123784)
Punch: Builder (124095)
Ribbon: Real Red 1/8" Taffeta (119251)
Wheel: Time For a Tree (104524)
Tools: Stampin' Around Handle (102971), Uninked Standard Cartridge (101529)
Thursday, September 8, 2011
Feliz Navidad
I taught the technique for this card at this last Friday's Card Club meeting. I taught the "Wipies Technique" using ink refills. As you know, I love to create my own backgrounds because that way they match the color of the cardstock I'm using.
I painted the little girl using markers (on watercolor paper) and then spread out the color with Aquapainters.
Have a great weekend and enjoy!
Cardstock: Soft Suede (115318), Very Vanilla (100650), Old Olive (100702), Glossy White (102599), Watercolor Paper (122959)
Stamp Set: Greeting Card Kids (W 199887, C 120633)
Ink: Real Red (103287), Old Olive (100531), Soft Suede (121608)
Embellishments: Vintage Trinkets (118764), Bitty Buttons (118761)
Ribbon: Crochet Trim Victoria (118481), Real Red 1/8" Taffeta (119251)
Punches: Decorative Label (120907), 2-1/2" Circle (120906)
Cool stuff: Dazzling Details (124117)
Subscribe to:
Posts (Atom)


